Loading Firmware
Building a project produces a ROM file (firmware), which can then be loaded onto an xPico 200 series device via Web Manager or the Web API. Secure Boot can be enabled to prevent unauthorized code from running on an xPico series 200 device. This page covers the process for loading firmware to the device, with or without Secure Boot. In the event you are not able to boot the device, you can recover or factory reset the device using the resources listed at the bottom of this page.
Uploading the ROM
The xPico 200 series gateway supports Firmware Over the Air (FOTA) update capability through the Device feature in Web Manager or through the firmware update Web API. If the xPico 200 series device is configured for Secure Boot, you must first sign the firmware image with your private key before loading the firmware to the device. See Secure Boot.
Web Manager
Follow these steps to upload firmware to an xPico 200 series device using Web Manager.
- Open Web Manager, go to the Device page, and click Firmware Upgrade.
- Click Choose File, browse to
work/project_name, and select the ROM file. If loading a signed ROM file, select the signed ROM file. - Click Upload and then click OK to confirm that you want to upload a new firmware image. The device erases the old image and receives and writes the new image. After the new firmware is written, the device reboots automatically. It may take a few minutes for this process to complete. After the reboot, the new firmware is active.
- If the new firmware includes a line protocol, change the line's protocol to the new option you just uploaded. Click Line and then click Configuration. From Protocol, select the new project's protocol and then click Submit. The changes take effect immediately.
Web API
Use this endpoint to upload firmware to an xPico 200 series device using the Web API.
- Description: Load the firmware image file
- Protocol: HTTP
- Method: POST
- Content Type: multipart/form-data
- URL: http://<hostname>/upgrade
Note
The request format emulates a filled-in form to produce a POST request with an HTTP content-type of "multipart/form-data".
Parameters:
imageFile: Name of the file containing the upgrade image.
HTTP Response Codes:
- 200: Success
- 507: Invalid partition size
- 500: All other failures
CURL example:
curl –digest –u admin:PASSWORD –X POST http://<hostname>/upgrade -F imageFile=@xPico200_1.6.0.0R50
Secure Boot
Secure Boot is an optional feature that prevents execution of unauthorized code and protects secret configuration values. To use Secure Boot, generate a key pair and submit the public key to Lantronix for signature using the request form. Program the Lantronix-signed public key into an xPico 200 series one-time programmable (OTP) memory and sign your firmware with the corresponding private key.
Note
The device must be loaded with your Lantronix-signed OEM public key before loading your signed firmware. Once the authorization is loaded, it cannot be removed or changed.
Development Workflow
Follow this Secure Boot workflow during development. Within the development workflow, the developer performs the following steps, working with the evaluation kits and sample modules for development and testing.
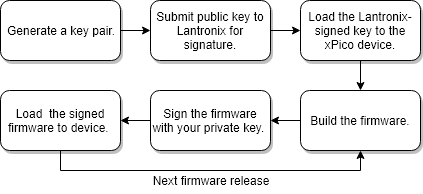
These one-time actions are performed during development.
-
Generate a 2048-bit RSA key pair using the following commands:
- Generate an RSA Private Key with exponent=65537
openssl genrsa -f4 -out oem_rsa_key.priv 2048 - Generate an RSA Public Key from the private key
openssl rsa -in oem_rsa_key.priv -pubout -out optional_rsa_key.pub
- Generate an RSA Private Key with exponent=65537
-
Use the request form to submit the public key to Lantronix for signature. Lantronix returns the signed public key as a ROM file that looks similar to
optional_rsa_key.pub.signed.rom. -
Next, use Manufacturing Test Loader to write the signed public key to the OTP. Manufacturing Test Loader is an application that can be loaded into the xPico 200 device over the serial interface. Connect to the device with a terminal emulator (e.g. Tera Term).
-
Configure the serial port. In Tera Term, click Setup and then Serial port....
- Set Port to the port you are using to connect to the device.
- Set Baud rate to 8 bit.
- Set Parity to none.
- Set Stop to 1 bit.
- Set Transmit delay to 0 msec/char and 0 msec/line.
- Set Flow Control to hardware.
- Click OK.
-
Save the Manufacturing Test Loader macro to your PC and run it using Tera Term. In Tera Term, click Control and then Macro. Select the macro and click Open.
-
Follow the prompts provided by Tera Term to send Manufacturing Test Loader to the device.
-
In the CLI, type
otp writesecurebit confirm. -
In the CLI, type
flash download serial. -
In Tera Term, click File and then Send File. Enter the path to the signed public key, select binary, and then click Open. Wait while the key is written to the device OTP memory. Once complete, you can verify the key has been written to OTP by typing
otp keysand looking at Optional RSA Key.
These recurring actions must be completed for each development firmware build.
-
Build the firmware. The ROM file looks similar to
xPico200_xxxxx.rom. -
Run the Lantronix image signing tool using the command
ltrx-signimage.exe oem_rsa_key.priv oem_sdk_1.0.0.0R1.rom oem_sdk_1.0.0.0R1.signed.rom. The signing tool produces a ROM file signed with your private key. The signed ROM file looks similar toxPico200_xxxxx.signed.rom. This step can also be automated by including it as a post-processing step of themakeprocess. -
Follow the steps in Uploading the ROM to load the signed firmware to the development boards and modules.
Manufacturing Workflow
Follow this Secure Boot workflow after development is complete and you have release firmware ready to load at production time. You should generate separate public and private key pairs for development and production. The production private key should not be shared with anyone outside the secure zone.
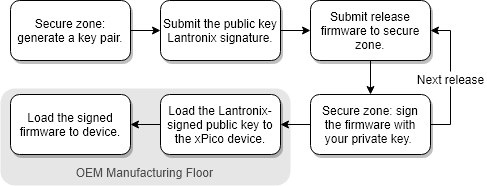
Within OEM Premises
Establish a secure zone using HSM (or another technique) within your organization to create a separate space where the ltrx-signimage.exe tool will execute with a private key generated for production.
Note
It is best practice for the manufacturing workflow to ensure the security of the OEM's private key by keeping the signing of production firmware separate from the development teams and workflows.
These one-time actions are performed during production within the OEM premises.
-
Within the secure zone, generate a 2048-bit RSA key pair using the following commands:
- Generate an RSA Private Key with exponent=65537
openssl genrsa -f4 -out oem_rsa_key.priv 2048 - Generate an RSA Public Key from the private key
openssl rsa -in oem_rsa_key.priv -pubout -out optional_rsa_key.pub
- Generate an RSA Private Key with exponent=65537
-
Use the request form to submit the public key to Lantronix for signature. Lantronix returns the signed public key as a ROM file that looks similar to
optional_rsa_key.pub.signed.rom.
These recurring actions must be completed within OEM premises for each production firmware release.
-
Submit release firmware built from the SDK to the secure zone for signing the release firmware with the private key.
-
Within the secure zone, run the Lantronix image signing tool using the command
ltrx-signimage.exe oem_rsa_key.priv oem_sdk_1.0.0.0R1.rom oem_sdk_1.0.0.0R1.signed.rom. The signing tool produces a ROM file signed with your private key. The signed ROM file looks similar toxPico200_xxxxx.signed.rom.
Within OEM Manufacturing
These recurring actions must be completed within OEM manufacturing for each module.
-
Use Manufacturing Test Loader to write the signed public key to the OTP. Manufacturing Test Loader is an application that can be loaded into the xPico 200 device over the serial interface. Connect to the device with a terminal emulator (e.g. Tera Term).
-
Configure the serial port. In Tera Term, click Setup and then Serial port....
- Set Port to the port you are using to connect to the device.
- Set Baud rate to 8 bit.
- Set Parity to none.
- Set Stop to 1 bit.
- Set Transmit delay to 0 msec/char and 0 msec/line.
- Set Flow Control to hardware.
- Click OK.
-
Save the Manufacturing Test Loader macro to your PC and run it using Tera Term. In Tera Term, click Control and then Macro. Select the macro and click Open.
-
Follow the prompts provided by Tera Term to send Manufacturing Test Loader to the device.
-
In the CLI, type
flash download serial. -
In Tera Term, click File and then Send File. Enter the path to the signed public key, select binary, and then click Open. Wait while the key is written to the device OTP memory. Once complete, you can verify the key has been written to OTP by typing
otp keysand looking at Optional RSA Key. -
Follow the steps in Uploading the ROM to load the signed firmware to the production devices and modules.
Note
xPico 200 series devices will only run firmware images signed either by Lantronix or by an authorized OEM that has loaded a public key signed by Lantronix to the xPico 200 gateway's OTP memory. To make the device exclusively run firmware signed with OEM private key (and not Lantronix firmware), contact your local FAE.
Recover Firmware
If you are not able to boot the xPico 200 series gateway using the usual methods, Lantronix Device Installer can be used to recover Lantronix-signed firmware. Use the Recover Firmware option to install firmware to recover the device using the serial port instead of the network.
If you are using OEM-signed firmware, please contact Lantronix support.
Lantronix DeviceInstaller is a Windows-based application that provides installation and configuration options for Lantronix devices.
To download DeviceInstaller v4.4.0.5 or higher, go to https://www.lantronix.com/products/deviceinstaller/.
Factory Reset the Device
Restoring to factory defaults resets the device configuration to factory default settings. Any user changes to the configuration are lost.
To reset the gateway to factory default settings:
In the Web Manager, go to Device and click Factory Defaults. Confirm that you want to reload factory default settings.
The configuration will be set to factory defaults and xPico 200 will reboot. Reload the IP address in the browser and log in.
In the CLI, navigate to the "status Device" level and run Factory Defaults. Confirm that you want to reload factory default settings.
The configuration will be set to factory defaults and xPico 200 will reboot.
Boot to CLI (Command Mode)
You can boot to CLI using escape sequences ! xyz, xxx, yyy, or zzz.