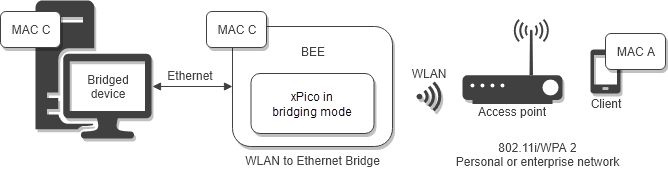
Ethernet to Wi-Fi Bridge
Ethernet to Wi-Fi bridging presents an Ethernet interface to host microcontrollers capable of running their own stack. Network connections to and from the bridging xPico 600 gateway are established using the Wi-Fi or SoftAP interface, with the bridged device connected to the Ethernet interface. The bridged device can communicate with the external network via the WLAN interface or with the xPico 600 via the Ethernet interface.
When bridging is enabled and active, the MAC address of the bridged device is shared with the WLAN interface and the SoftAP interface on the xPico 600. The xPico device can learn the MAC address of the bridged device or you can configure the MAC address of the bridged device.
A device on the network can communicate with the xPico gateway or the bridged device while bridging is enabled. The services of the xPico gateway versus the bridged device are determined by the ports that are open on either device. For a network device to communicate with the bridged device or xPico gateway using TCP (or another service), the network device must know the port number on the xPico gateway to send traffic to.
There are three basic bridging scenarios:
- Ethernet to Wi-Fi with static IP address
- Ethernet to Wi-Fi with dynamic IP address
- Ethernet to SoftAP
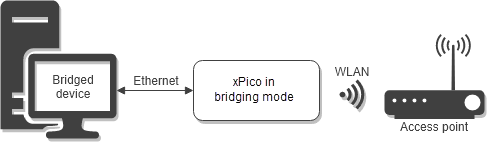
Bridging to the WLAN Interface
When bridging to the WLAN interface, you can specify a static IP address or allow DHCP to assign the IP address on the xPico gateway. If you specify a static IP address, then on the bridged device you will disable DHCP and assign a static IP address that matches the gateway. If you enable DHCP to assign the IP address on the WLAN interface, then the IP address on the bridged device will also be assigned by DHCP.
Configuring an Ethernet to WLAN Bridge
This tutorial describes how to set up a bridge for Ethernet to WLAN, with either static or dynamic IP.
You will need:
- A device with an Ethernet port to act as a bridged device. The IP address of the device can be static or dynamic
- A wireless access point
- An xPico 600 gateway
Follow these steps:
- Connect the Ethernet port on the bridged device to the Ethernet port on the xPico 600.
- Configure a WLAN profile to connect to the wireless access point. Test your xPico 600 for connectivity.
- Configure the Bridge. Set Interface to wlan0. The wlan0 interface is assigned an AutoIP address.
- To allow the xPico 600 to discover the MAC address of the bridged device dynamically, set Mode to Dynamic. Alternatively, set Mode to Static and set MAC Address to the MAC of the bridged device. See Bridge Configuration Settings for more information.
- Save your settings and reboot the xPico 600.
- From the bridged device, ping a device on the WLAN network to confirm the bridge is up.
wlan0 Bridging
Unlike ap0 bridging, wlan0 bridging cannot expose MACs from eth0 attached devices to the wireless side. Instead, the wlan0 bridge replaces the source device MAC with the wlan0 MAC when forwarding to the wireless net.
Conversely, packets received from the wireless net on wlan0 will all bear the wlan0 MAC destination, so these packets are further inspected at Layer 2 and those directed to eth0 attached devices will have the device MAC replace the wlan0 MAC destination. A table associating MAC addresses with IP addresses is maintained to facilitate this; the table may be viewed from the Web Manager under Bridge > Devices.
A MAC table entry is deleted after 2.5 hours of inactivity. This timeout period is compatible with a 2-hour TCP KeepAlive setting on the device or host. If the Interface:eth0 link goes down (cable unplugged, for example), all of the MAC table entries are deleted.
Setup for Bridge to wlan0
Typically, wlan0 will be set up for automatic assignment of IP addresses via DHCP. Alternatively, static assignment of IP addresses is possible.
DHCP
- For Interface wlan0 configuration, set “DHCP Client” as “Enabled”.
- For Interface eth0 configuration, however, set both “DHCP Client” and “DHCP Server” as “Disabled”.
Set “IP Address” with a local static address that will not conflict with any wlan0 assignments. Look at the IP address and mask that wlan0 gets assigned after connecting to the network. Often when Network Address Translation is in use, the IP address can be 192.168.1.xxx/24, though there is no rule for this.
Set the eth0 “IP Address” so it will not conflict, such as 192.168.99.250/0. Note that with zero mask, eth0 will be able to reply to any address that the bridged device may take on. - Set the Interface:eth0 priority lower (with a higher number) than the Interface:wlan0 priority so that any connections out from the Lantronix bridge host will route to the network.
Windows Bridged Device
Perform the following steps to allow a Windows bridged device to communicate directly with the Lantronix bridge host. These steps are not required if you do not intend to communicate directly between the Windows bridged device and the Lantronix bridge host.
- Run cmd as administrator, then run “route print”. The leftmost decimal number is the interface identifier; based on the MAC, identify which Windows interface you have connected to the Lantronix bridge host.
- Run “route add 192.168.99.250 0.0.0.0 if 20”, where you substitute your bridge host IP address for “192.168.99.250” and your Windows interface number for “20”.
- From your Windows bridged device, open a browser and connect to “192.168.99.250” (substitute your eth0 address), or connect to any other of the Lantronix bridge host network services.
Linux Bridged Device
With Linux, you will add a route in a similar fashion as described above for Windows. The command takes the form, “route add 192.168.99.250 dev eth0”.
Static IP Addresses
- For Interface wlan0 configuration, set “DHCP Client” as “Disabled” and set an “IP Address”.
- For Interface eth0 configuration, set both “DHCP Client” and “DHCP Server” as “Disabled”.
Then, set “IP Address” with an address that will not conflict with wlan0 or any of the other devices in your static network. - All of the devices should be set with the same mask.
- Set the Interface:eth0 priority lower (with a higher number) than the Interface:wlan0 priority so that any connections out from the Lantronix bridge host will route to the network.
Note that your bridged devices may communicate with the Lantronix bridged host via the eth0 address but not with the wlan0 address.
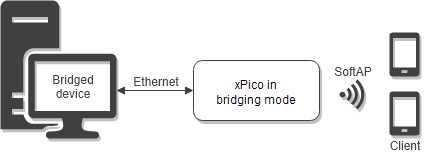
Bridging to the SoftAP Interface
An Ethernet to SoftAP (ap0) bridge establishes a restricted private network. All devices connecting to the SoftAP are assigned an IP address by the DHCP server on the ap0 interface. Up to 6 simultaneous clients can connect to Soft AP interface with the wireless client interface (wlan0) disabled. Up to 4 simultaneous clients can connect to Soft AP interface when the wireless client interface (wlan0) is active.
When bridging to the SoftAP interface, the IP address of the bridged device must be statically configured to match the IP address of the SoftAP interface of the xPico gateway. The bridged device can communicate with the xPico gateway on the Ethernet interface while bridging mode is enabled. To set this up, configure a static IP address on the xPico gateway's Ethernet Interface on the same subnet as the bridged device. If a static IP address is not configured, the eth0 interface of the xPico gateway will be assigned an AutoIP in the 169.254.x.x range. The device connected to the SoftAP can communicate if it has dual IP address capability by configuring its own second IP address to the AutoIP range.
Configuring an Ethernet to SoftAP Bridge
This tutorial describes how to set up a bridge connection for Ethernet to SoftAP.
You will need:
- A device with an Ethernet port to act as a bridged device
- A separate device with Wi-Fi (to ping from the bridged device)
- An xPico 600 gateway, without WLAN profiles configured
Follow these steps:
- Connect the Ethernet port on the bridged device to the Ethernet port on the xPico 600.
- Configure the bridged device. Assign a static IP address in the same subnet as the SoftAP (ap0) interface IP address. Note that the default IP address of the SoftAP interface is 192.168.0.1.
- Configure the Ethernet interface (eth0). Set IP Address to an IP address in the same subnet as the bridged device, set Priority to 2, and set DHCP to Disabled.
- Configure the SoftAP (ap0) interface. Set IP Address to an IP in the same subnet as the bridged device but different than the Ethernet interface IP address. Leave IP Address blank to use the default IP address of the SoftAP interface, 192.168.0.1.
- Configure the Bridge. Set Interface to ap0. The ap0 interface is assigned an AutoIP address.
- Set the Ethernet state to Disabled.
- Save your settings and reboot the xPico gateway.
- Use a separate device to connect to the xPico gateway via Wi-Fi. The bridge assigns the connecting device an IP address in the same subnet.
- From the bridged device, ping the connected device to confirm the bridge is up.
Passing Multicast IP Traffic
The xPico 600 gateway can be configured to pass multicast IP traffic using Internet Group Management Protocol (IGMP) through the Ethernet to WLAN interface bridge or Ethernet to SoftAP bridge. The bridged client on the Ethernet interface should be configured with an IP address in the same subnet as either the network behind the external access point if using the WLAN interface or as the SoftAP if using the SoftAP interface. The IP addresses of clients using IGMP to pass multicast IP traffic must be configured in the Bridge Configuration settings.
Bridge Configuration Settings
The following table describes the Web Manager Bridge configuration settings.
In the Web Manager, go to Bridge > Configuration to configure the bridge settings.
CLI settings: See Config Bridge Level
XML settings: See configgroup Bridge
Note
All bridge configuration settings require a reboot to take effect.
| Bridge Configuration Settings | Description |
|---|---|
| Interface | Disable the bridge interface or enable a specific interface to bridge to wlan0 or ap0. Disabled - turns bridging off. wlan0 - turns bridging on directed to and from wlan0. Configuration for IP Adressing, Static or Dynamic, must match between the bridged machine and this device. ap0 - turns bridging on directed to and from ap0. The bridged device has its own distinct MAC and IP addresses. |
| Wired Interface | May be "eth0" or "SLIP". This setting is only visible when Interface is set to wlan0 or ap0. |
| Allow All Multicast | May be Enabled or Disabled. This setting is only visible when Interface is set to wlan0 or ap0. |
| IGMP 1-6 IP Address | Up to six IP addresses can be configured to allow multicast IP traffic to pass through the Ethernet to Wi-Fi bridge using IGMP. These settings are only visible when Interface is set to wlan0 or ap0, and Allow All Multicast is set to Disabled. |