Automated Dial Tester
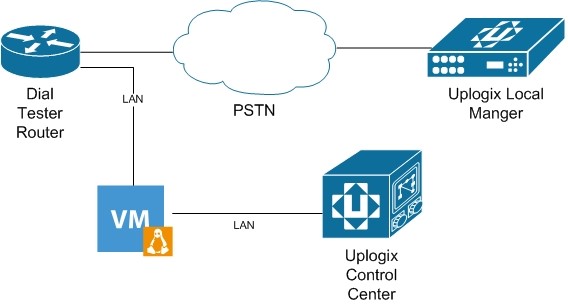
This document provides a guide for implementing a dial-in testing platform for the Lantronix Local Manager. By having the Local Manager out-of-band POTS line periodically tested, we eliminate the risk of unavailability when the dial-in path is required. The example setup in this document uses a Cisco 2821 with a WIC-1AM card.

Incorporation of the functionality of the VM into the Lantronix Control Center is part of the Lantronix roadmap, but until that product feature is incorporated, a VM will be required. As such, this beta deployment may need more assistance from Lantronix to maintain. The Lantronix Technical Services team is available to assist with deployment and management of this system.
Caution
Dialin Tester Version 0.2 is required for deployments running LMS 6.1 or later. Version 0.2 is backwards compatible with 6.0 and 5.5, but the original v0.1 Dial Tester will not work with a 6.1 Local Manager.
Requirements
You will need the following equipment/network configuration:
- Cisco Router running IPBASE with 1 WIC-1AM or WIC-2AM card
- VMWare server
- Lantronix Control Center
- Lantronix Local Manager
- V.92 modem for the Local Manager
- Active analog/POTS phone line for each Local Manager
- Active analog/POTS phone line for the Dial Tester
- TCP connectivity between VM and Dial router (in the 2000 range)
- TCP 22 between the VM and Control Center
Note
Currently, only Telnet connections between the dial-tester and the modem bank are supported.
The configuration of Dial router may vary slightly depending on the hardware and the IP schema used in the network. Before beginning, identify:
- IP interface static IP address, mask
- Default route
VM Deployment
Prepare a VM with the following allocation for the dial-in tester:
- 2 GB RAM
- 2 CPUs (2 cores per CPU)
- 12 GB disk space
- 8MB Video Card
- Single network interface
Deploy the OVA image provided by Lantronix onto the VMWare server and configure the VM with its static IP address.
Secure the Server
The v0.2 Dial Tester deploys with a default username of root and password of password.
Important
YOU SHOULD SECURE THE SERVER IMMEDIATELY
- Log into the server with root / password
-
Set dialin's password (previously: dialin in v0.1 dial-tester)
You can choose any password you prefer.
3. Add dialin user to sudoers
4. Disable root login
Edit the server's sshd config file.
Uncomment # PermitRootLogin yes and change yes to no.
Restart sshd.
[dialin@dt-centos7 ~]$ systemctl restart sshd
==== AUTHENTICATING FOR org.freedesktop.systemd1.manage-units ===
Authentication is required to manage system services or units.
Authenticating as: dialin
Password:
==== AUTHENTICATION COMPLETE ===
Verify root cannot log in.
user@workstation:~$ ssh root@172.30.5.162
root@172.30.5.162's password:
Permission denied, please try again.
root@172.30.5.162's password:
Configuration
Lantronix Control Center
At the root inventory group, enter the following settings in the Modem section of the Configuration menu:
- Enable Dial-in
- Rings: 1
- Allow all
- IP address of Dial router
- Port range: 2050
Check the box Force the update on the children and click Save.
Local Manager Configuration
Each Local Manager must have an individual telephone number listed in the Control Center. This can be configured using either the Control Center GUI or the Local Manager CLI. To configure from the Control Center, navigate to the Local Manager summary page and select Modem from the Configuration menu. Enter the phone number in the Remote Access Server section and click Save. To enter this information into the Local Manager from the CLI log in and browse to the modem resource. Run the command config answer and enter the telephone number.
Example:
[admin@LantronixDialExample (modem)]# config answer
[config answer]# number 5125551212
[config answer]# exit
Dial Tester Configuration
Create the list of Local Manager phone numbers for testing, then set up notifications and schedule testing on the Dial Tester.
Control Center
SSH into the Control Center, become root using the following command
sudo su -
Edit the test file generation script and replace the "admin" username with "LOGIN_IS_DISABLED" using the following commands
cd /uplogix/embassy/scripts/support
vi makeDialinTesterCsv.sh
Execute the test file script using the following command
./makeDialinTesterCsv.sh
Copy the newly created CSV file using the following command (replace x.x.x.x with your Control Center IP and the yyy-mm-dd today's date) - dialin/dialin are username/password
scp /tmp/UplogixDialinTester-2015-01-27.csv dialin@x.x.x.x:/home/dialin/list.csv
Dial Tester VM
SSH into the dialTester with dialin/dialin as user name and password
Install net-snmp (if not already on OVA)
Configure the notification script to include appropriate notification methods (SMTP/SNMP) and format using the following command. If the file does not exist, run dialin-tester once to generate it.
vi dialin-tester.notify
Create a crontab file by issuing the following command
crontab -e
Change the cron job to run once weekly on Sunday at midnight by inserting the following line:
0 0 * * 0 /usr/local/bin/dialin-tester once >> /home/dialin/cronlog
To run the job once to confirm activity issue the following command
dialin-tester once
Viewing Dial Tester results
- Browse to IP address of the Dial Tester VM
- Click on the 'Dialin' hyperlink
- Click on the 'archive' hyperlink
- Click on the most recent entry
- Click on the 'batch.log.csv' hyperlink
- Either open or save the file to your local PC
- Open the batch.log.csv file into Excel, look at column H for any Result other than logout, i.e. timeout, busy