Bluetooth
Bluetooth allows devices to transmit data wirelessly. It uses the 2.4 GHz radio frequency band. The xPico 250 and xPico 270 support dual-mode Bluetooth Classic and BLE wireless connectivity. The diagram below shows the Bluetooth stack of the xPico 250 and xPico 270 in the center as well as that of a Bluetooth Classic device on the left and a BLE device on the right.
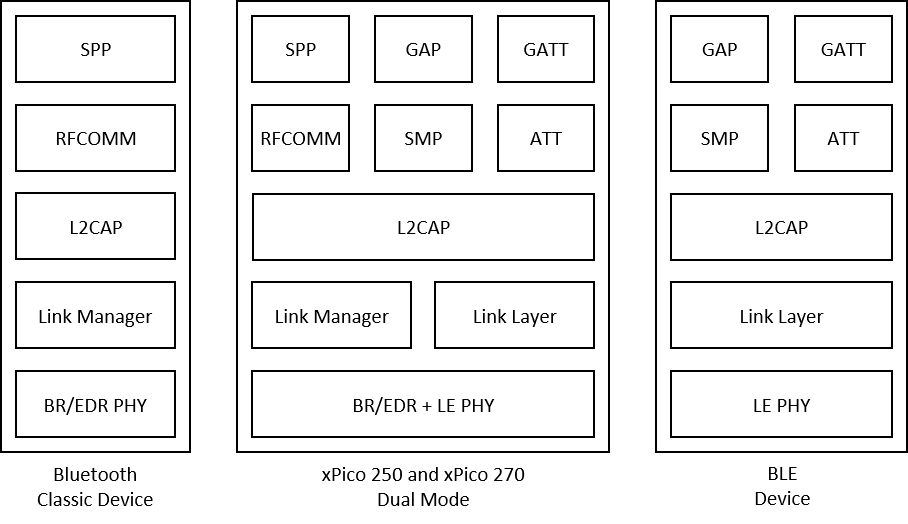
Customers have to implement BLE profiles on top of GATT for BLE. For BT Classic, SPP is included. Additional profiles are planned for future releases, and the SDK can be utilized to develop them as well.
For sample applications, see the SDK User Guide.
BLE
BLE (Bluetooth low-energy) is optimized for short bursts of data transmission and is designed for low power consumption. BLE devices have pre-connection and post-connection roles.
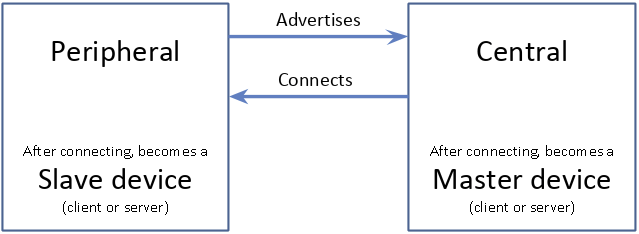
Before connection, a BLE device is a peripheral or a central device. Peripheral devices advertise and wait for a wireless connection from a central device. Central devices scan for peripherals. Once the connection is made, a peripheral device is a slave and a central device is a master.
After connection, a device can be either a client or a server. This is separate from the peripheral/central or slave/master roles. A client accesses resources hosted on the server. In most cases, the peripheral device becomes the server and the central device becomes a client.
BLE Central Role
In the BLE Central Role, the xPico 250 and xPico 270 can use QuickConnect to connect to devices using GATT.
BLE Central Status
You can view the status of the BLE Central state as well as a list of connected devices. A connected device's name, device address, options, and status is displayed.
The options column represents the following advertisement types:
| Value | Description |
|---|---|
| 0 | Device is not configured with advertisement flags. |
| 1 | Limited Discoverable Mode |
| 2 | General Discoverable Mode |
| 4 | BR/EDR Not Supported |
| 5 | Limited Discoverable Mode, BR/EDR Not Supported |
| 6 | General Discoverable Mode, BR/EDR Not Supported |
| 8 | Simultaneous LE and BR/EDR to Same Device Capable (Controller) |
| 9 | Limited Discoverable Mode, Simultaneous LE and BR/EDR to Same Device Capable (Controller) |
| 10 | General Discoverable Mode, Simultaneous LE and BR/EDR to Same Device Capable (Controller) |
| 16 | Simultaneous LE and BR/EDR to Same Device Capable (Host) |
| 17 | Limited Discoverable Mode, Simultaneous LE and BR/EDR to Same Device Capable (Host) |
| 18 | General Discoverable Mode, Simultaneous LE and BR/EDR to Same Device Capable (Controller) |
| 24 | Simultaneous LE and BR/EDR to Same Device Capable (Controller, Host) |
| 25 | Limited Discoverable Mode, Simultaneous LE and BR/EDR to Same Device Capable (Controller, Host) |
| 26 | General Discoverable Mode, Simultaneous LE and BR/EDR to Same Device Capable (Controller, Host) |
In Web Manager, go to Bluetooth > BLE > Central > Status.
For CLI, see Status Bluetooth BLE Central level.
For XML, see configgroup Bluetooth BLE Central.
Bluetooth BLE Central QuickConnect
Use QuickConnect to discover and connect to devices.
Standard operating firmware now supports automatic connection management. When devices come within proximity of the gateway, they can start communicating when connected without needing to go through the complete connection management process.
To access Bluetooth BLE Central QuickConnect in Web Manager, go to Bluetooth > BLE > Central > QuickConnect.
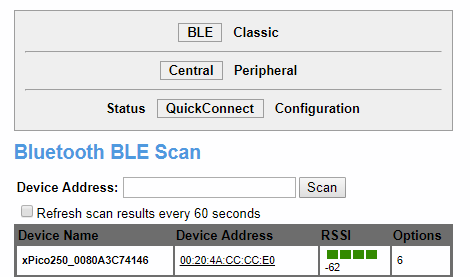
You can see a list of all Bluetooth BLE devices using the GATT profile within range. This is the discovery phase of the Bluetooth connection process. To perform a directed scan for a particular device, enter the device address, formatted as xx:xx:xx:xx:xx:xx in the Device Address field and click Scan. To refresh the scan results every 60 seconds, check the box.
Scan results include device name, address of the device, Received Signal Strength Indicator (RSSI), and Options. See BLE Central Status for a description of the Options column.
Click the device address to attempt to connect to that device.
For CLI, navigate to the status Bluetooth BLE Central level. Use Broadcast scan to scan for Bluetooth devices within range. Alternatively, use Directed scan <Device Address> to scan for a particular device address. Locate the Bluetooth device to which you want to connect and note its device address. To connect to that device, use Connect <Device Address>. For more information, see Status Bluetooth BLE Central level.
Bluetooth BLE Central Configuration Settings
In Web Manager, go to Bluetooth > BLE > Central > Configuration.
For CLI, see Config Bluetooth BLE Central level.
For XML, see configgroup Bluetooth BLE Central.
| Settings | Description |
|---|---|
| Mode | Enable or disable Bluetooth BLE Central. |
| Autoconnect Interval | Specify the period of time to wait before trying to reconnect to devices. This can be in seconds, minutes, and/or hours. |
| Autoconnect Timeout | Specify the period of time the device will continue to attempt to reconnect to devices. After the timeout period, the device will stop trying to reconnect until the Autoconnect Interval has passed. This can be in seconds, minutes, and/or hours. |
BLE Peripheral Role
In the BLE peripheral role, xPico 250 and xPico 270 supports the Gateway Provisioning Profile by default. Use the SDK to build your BLE profiles on top of the GATT layer and integrate it within your own embedded application.
Gateway Provisioning Profile enables communication with the Lantronix Gateway Provisioning mobile application for iOS or Android. Using the application, you can use your mobile device to connect to the gateway, complete initial gateway provisioning, and configure the gateway.
See the Gateway Provisioning mobile application documentation for iOS or Android for more information. The Gateway Provisioning mobile application can be found on the App Store for iOS and Google Play for Android.
BLE Peripheral Status
You can view the BLE Peripheral state, the Bluetooth device address for the local Bluetooth device, and the Bluetooth device address for the connected device.
In Web Manager, go to Bluetooth > BLE > Peripheral > Status.
For CLI, see Status Bluetooth BLE Peripheral level.
For XML, see configgroup Bluetooth BLE Peripheral.
BLE Peripheral Configuration Settings
To enable/disable BLE Peripheral:
In Web Manager, go to Bluetooth > BLE > Peripheral > Configuration.
For CLI, see Config Bluetooth BLE Peripheral level.
For XML, see configgroup Bluetooth BLE Peripheral.
Bluetooth Classic
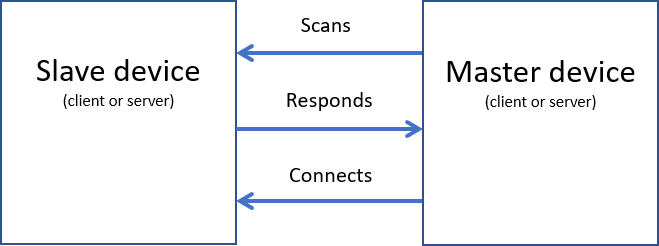
Bluetooth Classic uses the master/slave architecture. The master device scans for slave devices, which respond to the inquiry. The master then initiates a connection.
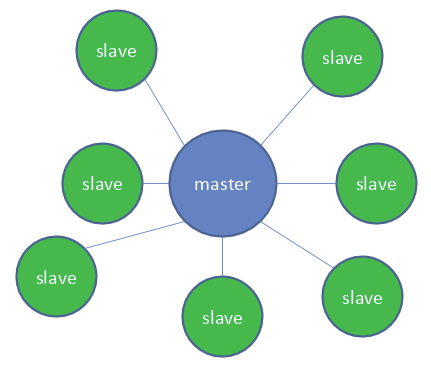
One master device can connect to a maximum of seven slave devices. A slave device can only be connected to a single master device. A master device can communicate with any slave device to which it's connected. A slave device can communicate only with the master device to which it's connected. The xPico 250 and xPico 270 support the master and slave role with the SPP profile and store bond information for up to seven devices (including Bluetooth Classic, BLE, master, and slave). The xPico 250 and xPico 270 has three SPP Lines, allowing access and communication to a maximum of three SPP devices at a time.
Bluetooth Classic Master Mode
In the master role, the xPico 250 and xPico 270 can connect to slave devices.
Bluetooth Classic Master Status
You can view the status of the Bluetooth Classic Master state as well as a list of bonded devices. A bonded device's name, device address, Profile, and state is displayed.
In Web Manager, go to Bluetooth > Classic > Master > Status.
For CLI, see Status Bluetooth Classic Master level.
For XML, see configgroup Bluetooth Classic Master.
Bluetooth Classic Master QuickConnect
Use QuickConnect to discover and pair to devices.
Standard operating firmware now supports automatic connection management. When devices come within proximity of the gateway, they can start communicating when connected without needing to go through the complete connection management process.
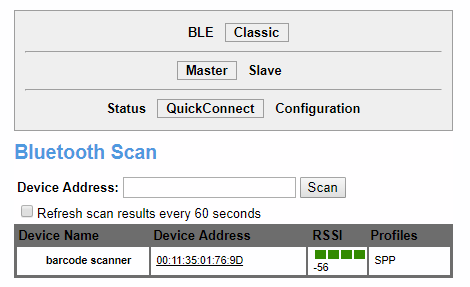
To access Bluetooth Classic Master QuickConnect in Web Manager, go to Bluetooth > Classic > Master > QuickConnect.
You can see a list of all Bluetooth devices within range. This is the discovery phase of the Bluetooth connection process. To perform a directed scan for a particular device, enter the device address , formatted as xx:xx:xx:xx:xx:xx in the Device Address field and click Scan. To refresh the scan results every 60 seconds, check the box.
Scan results include device name, address of the device, Received Signal Strength Indicator (RSSI), and Profile.
Click the device address to page and attempt to pair and bond to that device.
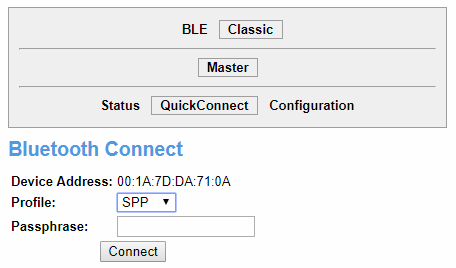
The Bluetooth Connect page will open. Select the profile, enter the passphrase, and click Connect to connect to the device. If the device is unable to connect, please check the tlog. See Logging for more information.
For CLI, navigate to the status Bluetooth Classic Master level. Use Broadcast scan to scan for all Bluetooth devices with supported profiles within range. Alternatively, use Directed scan <Device Address> to scan for a particular device address. Locate the Bluetooth device to which you want to connect and note its device address. To connect to that device, use Connect <Device Address> <profile> [passphrase]. For more information, see Status Bluetooth Classic Master level.
Important
If you attempt to connect an unnamed device, the connection will fail. Once this happens, the QuickConnect page must be reloaded before any successful connection can be made. Click QuickConnect at the top to reload.
Bluetooth Classic Master Configuration Settings
In Web Manager, go to Bluetooth > Classic > Master > Configuration.
For CLI, see Config Bluetooth Classic Master level.
For XML, see configgroup Bluetooth Classic Master.
| Settings | Description |
|---|---|
| Mode | Enable or disable Bluetooth Classic Master. |
| Autoconnect Interval | Specify the period of time to wait before trying to reconnect to devices. This can be in seconds, minutes, and/or hours. |
| Autoconnect Timeout | Specify the period of time the device will attempt to reconnect to devices. This can be in seconds, minutes, and/or hours. |
Bluetooth Classic Slave Mode
In the slave role, the xPico 250 and xPico 270 can connect to a single master device.
Bluetooth Classic Slave Status
You can view the state (enabled or disabled) of Bluetooth Classic Slave, the local device address of the xPico 200 series gateway, and the device address of the connected device. You can also view a list of bonded devices with device names and addresses.
In Web Manager, go to Bluetooth > Classic > Master > Status.
For CLI, see Status Bluetooth Classic Slave level.
For XML, see configgroup Bluetooth Classic Slave.
Bluetooth Classic Slave Configuration Settings
In Web Manager, go to Bluetooth > Classic > Slave > Configuration.
For CLI, see Config Bluetooth Classic Slave level.
For XML, see configgroup Bluetooth Classic Slave.
| Settings | Description |
|---|---|
| Mode | Enable or disable Bluetooth Classic Slave. |
| Connection Mode | Sets the connection mode. Disabled: This disables discoverability and connectibility. Discoverable: This makes the xPico 200 series gateway discoverable but not connectible. Connectable: This makes the xPico 200 series gateway discoverable and connectible. |
| Device Name | The Device Name may contain up to 25 characters and defaults to the model name and serial number. |
| Serial Port Profile | Enable or disable the SPP server. |
| Serial Port Service Channel | Specifies the channel used for the Serial Port Service. |
Bluetooth Classic SPP Line
After a Bluetooth Classic device using the SPP profile has connected to the gateway, it can be assigned an SPP Line for data communication.
Bluetooth Classic Master SPP Line
To assign an SPP Line as a master device in Web Manager:
- Go to Bluetooth SPP > Master.
- Locate the device by device address in the table and click Edit.
- Select an SPP line in the list.
- Click Submit.
For CLI, see Config Bluetooth_SPP Master level.
For XML, see configgroup Bluetooth_SPP Master.
Note
If an SPP Line is set to Tunnel and then the corresponding Bluetooth device is forgotten, the tunnel will remain as an active connection.
Bluetooth Classic Slave SPP Line
To assign an SPP Line as a slave device in Web Manager:
- Go to Bluetooth SPP > Slave.
- Select an SPP line in the list.
- Click Submit.
For CLI, see Config Bluetooth_SPP Slave level.
For XML, see configgroup Bluetooth_SPP Slave.
Note
If an SPP Line is set to Tunnel and then the corresponding Bluetooth device is forgotten, the tunnel will remain as an active connection.
Bluetooth Classic SPP Line Configuration Settings
The following table describes the Web Manager Line SPP_1, Line SPP_2, and Line SPP_3 configuration settings.
Links to the equivalent settings for the CLI and XML reference are listed below.
CLI settings: See Config Line Level
XML settings: See configgroup Line
| Settings | Description |
|---|---|
| Name | Name or short description for the line, if desired. By default, there is no name specified. A name that contains white space must be surrounded by quotations. |
| State | Operational state of the Line. Can be Enabled or Disabled. The default is Enabled. |
| Protocol | Operational protocol for the Line. Choices are: - Command Line - MACH10 Command Interface - Modbus ASCII - Modbus RTU - Modem Emulation - Monitor - Mux - None - Trouble Log - Tunnel See Line Operating Modes |
| Gap Timer | Gap timer is the delay in milliseconds to pass from the last character received, before the driver forwards the received serial bytes. By default, the delay is four character periods at the current baud rate (minimum 1 msec). Gap Timer range is 1 to 5000 milliseconds. |
| Threshold | Number of threshold bytes which need to be received in order for the driver to forward received characters. Default value is 56 bytes. |
| Push | If defined, the driver will forward received characters after the Push sequence of characters is received. An example would be <J> |
Bluetooth Connection Process
Connecting a Bluetooth device consists of multiple phases.
- Discovery: A BLE central device or Bluetooth Classic master scans for Bluetooth devices that are advertising.
- Paging: A master device pages a slave device to request a connection. The slave device sends a response. This phase is only applicable to Bluetooth Classic.
- Pairing: Two devices exchange security information in order to create a connection.
- Bonding: Two devices store security keys that were exchanged when pairing so they can use them again to connect in the future.
- Connecting: After pairing is successful, the devices are connected.
- Communicating: Once the devices are connected, they can exchange data.