Configuration and Setup
Lantronix gateway operating system provides a common configuration database to store the operating parameters for the gateway. These parameters control the operation of the gateway with respect to network connectivity, device data communication, security, and system functions. The gateway's configuration is stored in Flash (nonvolatile memory) and retained even when the device is not powered up.
By using the available front-end interfaces, OEMs can integrate with the gateway from either the device controller or from the network side.
The xPico 200 series embedded gateway provides a number of simple to use configuration front-end interfaces:
For initial Wi-Fi setup, the Web Manager and CLI provide simple interfaces to connect the gateway and get an IP address. These interfaces provide full access to the features of the xPico 200 series embedded gateway.
The XML interface allows you to write configuration settings to the gateway using the serial command interface or Web APIs.
The Web API interface provides HTTP commands to read, write, update, and delete device configuration for many of the gateway's features.
Important
Always review configuration changes. Applying incorrect configuration could lead to unexpected behavior or errors with gateway operations.
Web Manager
The Web Manager application provides browser-based access to all the features of your embedded gateway. As long as the gateway has an IP address, which means it is connected to the network or connected to your PC or mobile device using SoftAP, you can use Web Manager to access the gateway.
The Web Manager allows you to view status and configure the gateway's applications and interfaces, monitor system functions and activity, and perform device maintenance operations.
You have the ability to customize the Web Manager application to apply your branding via the CSS, hide configuration menus, and add custom web pages. For information on branding and OEM customizations, see OEM Branding and Customization.
Accessing the Web Manager
For first time set up, see Getting Started.
To log into Web Manager
If you know the IP address of the gateway, open a web browser and point to the IP address.
If you don't know the IP address assigned to the gateway, you can use the Lantronix Provisioning Manager application to discover the gateway and learn the IP address. To download Lantronix Provisioning Manager, go to https://www.lantronix.com/products/lantronix-provisioning-manager/.
At the gateway's login prompt, enter the user name and password.
The factory default login is the following:
- User Name: admin
- Password: PASSWORD (case sensitive - use uppercase)
Important
Please change the default administrator password to keep your device secure. Go to the User menu to change the administrator password.
It is also recommended that you use OEM settings during manufacturing test to store unique access passwords for each device. See OEM Specific Settings.
Web Manager Components
When you log in, the Web Manager Status page provides a summary of the gateway, including product information, network and serial settings, and details about applications on the gateway.

The Web Manager UI displays the configuration menu on the left, the content area in the middle, and the Logout link and context-sensitive help information on the right. The help content displays field-level descriptions when you hover your pointer (mouse) over a specific field in the content area.
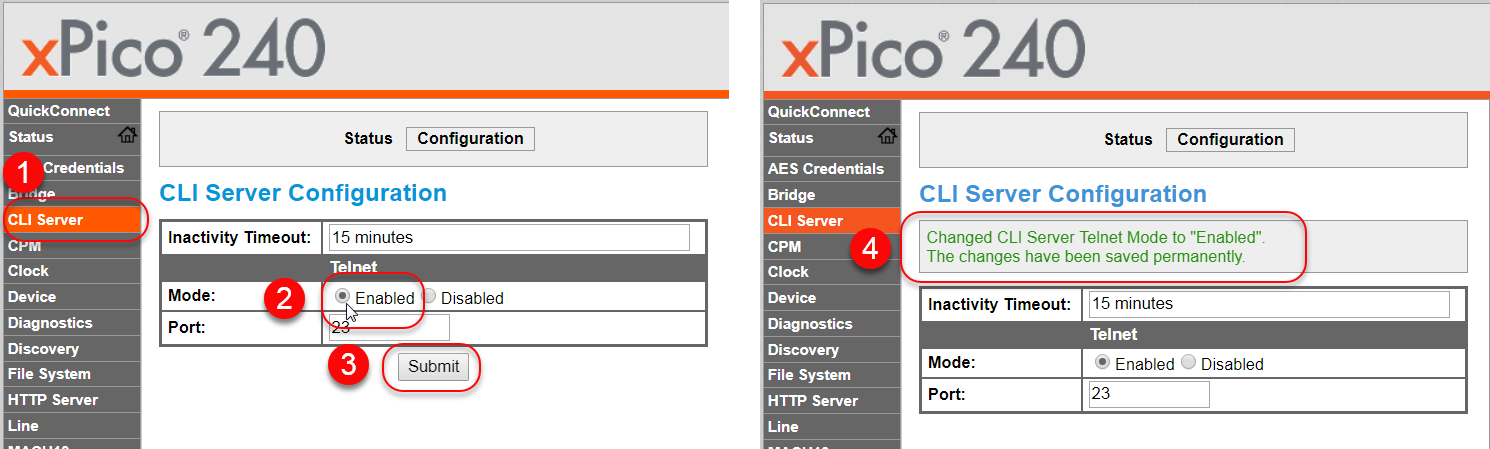
Using the Web Manager
Click a configuration menu on the left to view status and configure the feature. Make the desired change and save the configuration settings. Typically, you must click Submit to save the changes. The Web Manager displays an informational message about the changes that were applied.
Note
All changes that you make through the Web Manager take effect immediately unless otherwise noted. If the configuration requires a reboot, the Web Manager UI will display a message. You should reboot the gateway and wait 20-30 seconds before attempting to make a connection.
Command Line Interface (CLI)
The CLI provides access to the gateway's features through the UART or USB serial port via local or remote terminal. The CLI is a good choice for users who prefer to work in command line mode or want to use scripts to automate the configuration. You use the CLI to view and export status, make configuration changes, perform device maintenance operations, and to import and export XML configuration.
The CLI Reference provides descriptions of the supported commands as well as useful shortcuts for navigating the CLI.
To use the CLI to export and import the XML configuration records, see XML Configuration.
Accessing the CLI
To access the CLI, connect your PC to the UART on the gateway. Make sure that the corresponding Line protocol is set to "Command Line". You can set this in Web Manager.
The default configuration boots the gateway to Command Line mode. If the Line protocol is set to some other mode, use one of the following options to access command line:
- Configure the Line to Command Line in Web Manager.
- Factory reset the gateway to its default configuration.
- Boot the gateway to Command mode.
Open a terminal emulator such as Tera Term and make a connection to the serial COM port on the gateway. Configure the serial port settings for the connection to associate with the gateway. These include the baud rate (typically 9600 or 115200), 8-bit, No parity, 1 stop bit, no flow control.
Type any character in the terminal window to display the command line prompt >. The following message may also be displayed: "Command Line started." This is the root level.
Command Line started.
>
- At the command prompt, type
?to view a list of the root level commands. - Type a command, such as
configto enter the configuration command level. The prompt displays the name of the current command level.
>config<enter>

config>
The CLI is organized hierarchically into groups. For more information about navigating CLI and using the shortcuts and editing keys, refer to the CLI Reference.
Boot to Command Mode
The Boot to Command Mode feature allows you to access the status and configuration CLI via the serial port regardless of the configured gateway settings, using the Boot to CLI procedure. The original configured Line 1 settings will be restored once you exit the CLI, unless you change any Line 1 settings within the CLI.
Examples of using the Boot to CLI procedure for XML configuration would be to allow you to load a region code using the OEM configuration group or to switch the line protocol to modem emulation or other required default configuration. Configuring XML over Serial Port describes how to import and export XML configuration.
Note: Flow control is required on the serial port when importing XML.
The Boot to CLI procedure can also be used as a device recovery method. The CLI will come up using default Line 1 settings (not any user configured settings). Any changes to the Line settings take place immediately, replace any stored settings, and affect the CLI operation. Upon exit from the CLI, the Line will use configured settings and apply the designated Line protocol.
You can use either of the following escape character sequences to boot to CLI:
- send
x,y, orzASCII characters (case insensitive) - send
!ASCII character until it is echoed back, and then sendxyz(case insensitive)
To boot to CLI:
- Connect a terminal or a PC running a terminal emulation program host to Line 1 of the gateway's serial ports.
- Configure the terminal host serial line settings: 9600, 8-bit, No parity, 1 stop bit, no flow control.
- With the device powered on, press and hold the Default and Reset signal on the evaluation board or have the host controller assert the Default and Reset lines.
- Release or de-assert the Reset signal.
- While pressing or asserting the Default line, type or send the
x,y,zor!ASCII character (letters are case insensitive) repeatedly until the device identifier string is displayed. - Release or de-assert the Default signal.
- If
!was sent, sendxyz(case insensitive).
Results:
For the x escape sequence, the response is the device identifier string followed by an
xPico240 <MAC ADDRESS>
Press <enter> to continue>

Command Line started.

>
For the y and z escape characters, the response in both cases is just the device identifier string. As with the x escape sequence, a subsequent newline will result in the command prompt.
xPico240 <MAC ADDRESS>

Command Line started.

>
For the !xyz escape sequence, the response is the device identifier string.
Using the CLI
To view configuration status through the CLI, navigate to the status command level and then enter the group name. Enter show to view current configuration.
To make a configuration change through the CLI, navigate to the config command level and enter the desired command and value. You must write the configuration changes in order to save them to flash (nonvolatile memory). The CLI displays a message about the changes that were made.
Some configuration changes require a reboot in order for the change to take effect. To reboot, navigate to the "status Device" level and enter the Reboot command.
status Device>Reboot
CONFIRM: Reboot this device? (okay/cancel)okay
WARNING: Rebooting...

Command Line started.

>
Example config command
This simple example changes the clock setting from NTP to Manual. To try out this example, start from the root level of the command line and issue the commands as shown below:
| What you type | Result |
|---|---|
config<enter> |
Enter the configuration level from root level |
clock<enter> |
Enter the clock level |
show |
View the current clock configuration |
source Manual |
Change the source from NTP to Manual |
> config

config> clock

config Clock> show
Clock Configuration:
  Source    : NTP
  UTC Offset: 0 minutes

config Clock> source manual
Changed Clock Source to "Manual".
WARNING: Change will not persist after reboot unless you "write".
Note
The result message describes the configuration change and a WARNING message that you must "write" in order to save the configuration change to flash.
At the command prompt, enter write to save the changes. You will see the following message:
config Clock>write
The changes have been saved permanently.
XML Interface
The xPico 200 series embedded gateway provides an XML interface to configure the gateway using XML configuration records (XCRs). XML configuration records are easy to edit with a standard text editor or an XML editor.
For a brief overview of XML, see XML Configuration Language. It provides rules on basic XML syntax, a guide to the specific XML tags used, and a guide to using XML configuration records.
For additional guidelines for importing and exporting XML configuration, see Best Practices for XML Configuration.
You can use either of the following methods to import and export XML configuration:
- Using the CLI to configure XML over serial port
- Using Web APIs to configure XML over the network
You can also export XML status record (XSR) groups and items. To do this using the CLI, see Exporting XML Status (XSR) over Serial Port. To do this using the Web APIs, see Configuring XML over the Network.
Configuring XML over Serial Port
The serial port can be used to import and export XML configuration. To use the serial port in this manner refer to the setup and use of Boot to Command Mode.
To ensure optimal performance when configuring and managing the device using XML, you must enable serial port flow control. This may be hardware or software flow control, which can be set up by means of the CLI if necessary. We recommend the use of hardware flow control to ensure the best throughput.
The CLI can be accessed via the methods previously described, as well as the following methods:
- From the Modem Emulation serial application by entering the "ATD 0" command
- From the TruPort Socket (Mux) application by entering the "D" command
To configure flow control options on the CLI:
- Navigate to the config level to display the
config>prompt. - Navigate to the Line 1 level to display the
config Line 1>prompt. - Type
Flow Control HardwareorFlow Control Softwareand press Enter on the keyboard.
Note: Software flow control experiences overrun above 460800 baud.
Example CLI:
> config
config> Line 1
config Line 1> Flow Control Hardware
Changed Line 1 Flow Control to "Hardware".
WARNING: Change will not persist after reboot unless you "write".
Exporting XML Configuration (CLI)
You can export an entire XCR or a partial XCR directly to the serial line CLI.
- Connect the gateway to the PC and access the CLI.
- Navigate to the xml level to display the
xml>prompt. - Issue the
xcr dumpcommand to export the entire XML configuration orxcr dump [group-list]to export a portion of the XML configuration. - Copy and paste the configuration text into a basic text editor or XML editor.
- Remove all the spaces in the script within the text editor. The basic text is the exported XML configuration and is now available for copy-paste into any xPico 200 series gateway.
Tips:
- To export the entire XCR, issue the
xcr dumpcommand. - To export a portion of the XML configuration, issue the
xcr dump [group-list]command. - To specify an instance of a group, issue the
xcr dump [group:instance]command. - To export multiple groups, separate the groups with a semicolon. For example:
xcr dump clock;interface
Example XML export output:
xml> xcr dump clock
<?xml version="1.0" standalone="yes"?>
<!-- Automatically generated XML -->
<!DOCTYPE configrecord [
   <!ELEMENT configrecord (configgroup+)>
   <!ELEMENT configgroup (configitem+)>
   <!ELEMENT configitem (value+)>
   <!ELEMENT value (#PCDATA)>
   <!ATTLIST configrecord version CDATA #IMPLIED>
   <!ATTLIST configgroup name CDATA #IMPLIED>
   <!ATTLIST configgroup instance CDATA #IMPLIED>
   <!ATTLIST configitem name CDATA #IMPLIED>
   <!ATTLIST configitem instance CDATA #IMPLIED>
   <!ATTLIST value name CDATA #IMPLIED>
]>
<configrecord version = "0.1.0.1">
   <configgroup name = "Clock">
      <configitem name = "Source">
         <value>NTP</value>
      </configitem>
      <configitem name = "UTC Offset">
         <value>0 minutes</value>
      </configitem>
   </configgroup>
</configrecord>
Importing XML Configuration
You can import an entire XCR or a partial XCR directly to the serial line CLI.
Refer to Best Practices for XML Configuration for guidelines about importing the XML configuration.
- Modify the XML configuration in a basic text editor or XML editor.
- Copy and paste the XML configuration text at the CLI prompt in the terminal emulator connected to the gateway. The gateway immediately processes the configuration record, changing any settings specified. This can be done at any CLI level, including root.
Example XML configuration import:
<?xml version="1.0" standalone="yes"?>
<!-- Automatically generated XML -->
<!DOCTYPE configrecord [
   <!ELEMENT configrecord (configgroup+)>
   <!ELEMENT configgroup (configitem+)>
   <!ELEMENT configitem (value+)>
   <!ELEMENT value (#PCDATA)>
   <!ATTLIST configrecord version CDATA #IMPLIED>
   <!ATTLIST configgroup name CDATA #IMPLIED>
   <!ATTLIST configgroup instance CDATA #IMPLIED>
   <!ATTLIST configitem name CDATA #IMPLIED>
   <!ATTLIST configitem instance CDATA #IMPLIED>
   <!ATTLIST value name CDATA #IMPLIED>
]>
<configrecord version = "0.1.0.1">
   <configgroup name = "Clock">
      <configitem name = "Source">
         <value>Manual</value>
      </configitem>
      <configitem name = "UTC Offset">
         <value>0 minutes</value>
      </configitem>
   </configgroup>
</configrecord>
Exporting XML Status (XSR) over Serial Port
The XML status record shows the status of the device. You can export the XML status using the serial port or the Web APIs. To export using the Web APIs, see Configuring XML over the Network.
As with the XML configuration, you can export an entire XSR or a partial XSR directly to the serial line CLI.
- Connect the gateway to the PC and access the CLI.
- Navigate to the xml level to display the
xml>prompt. - Issue the
xsr dumpcommand to export the entire XML configuration orxsr dump [group-list]to export a portion of the XML configuration.
Tips:
- To specify an instance of a group, issue the
xsr dump [group:instance]command. - To export multiple groups, separate the groups with a semicolon. For example:
xsr dump clock;interface
Example output:
xml>xsr dump clock
<?xml version="1.0" standalone="yes"?>
<!-- Automatically generated XML -->
<!DOCTYPE statusrecord [
   <!ELEMENT statusrecord (statusgroup+)>
   <!ELEMENT statusgroup (statusitem+,statusgroup*)>
   <!ELEMENT statusitem (value+)>
   <!ELEMENT value (#PCDATA)>
   <!ATTLIST statusrecord version CDATA #IMPLIED>
   <!ATTLIST statusgroup name CDATA #IMPLIED>
   <!ATTLIST statusgroup instance CDATA #IMPLIED>
   <!ATTLIST statusitem name CDATA #IMPLIED>
   <!ATTLIST statusitem instance CDATA #IMPLIED>
   <!ATTLIST value name CDATA #IMPLIED>
]>
<statusrecord version = "0.1.0.1">
   <statusgroup name = "Clock">
      <statusitem name = "Current Time">
         <value>2018-01-17 22:42:54</value>
      </statusitem>
   </statusgroup>
</statusrecord>
Configuring XML over the Network
You can use the Web APIs to import and export XML configuration as well as export XML status.
Exporting XML Configuration
You can export the entire XML configuration or only a portion of the XCR. To export a portion, specify each group using the optionalGroupList parameter, with groups separated by a semicolon.
To export the entire XML configuration:
curl --digest -u admin:PASSWORD http://<ip-address>/export/config -X POST
To export a portion of the XML configuration:
curl --digest -u admin:PASSWORD http://<ip-address>/export/config -X POST -d "optionalGroupList=Interface:wlan0"
For additional cURL and Javascript examples, see Export Configuration Group in the Web API Reference.
Importing XML Configuration
The configuration can be imported from a local file in the file system of the gateway or with the configuration as part of the command.
An example to import the clock source using the configuration in the command would look as follows:
cURL example (configuration as part of command):
curl --digest -u admin:PASSWORD http://<ip-address>/import/config -X POST --form-string 'configrecord=<?xml version="1.0" standalone="yes"?>
<!-- Automatically generated XML -->
<!DOCTYPE configrecord [
   <!ELEMENT configrecord (configgroup+)>
   <!ELEMENT configgroup (configitem+)>
   <!ELEMENT configitem (value+)>
   <!ELEMENT value (#PCDATA)>
   <!ATTLIST configrecord version CDATA #IMPLIED>
   <!ATTLIST configgroup name CDATA #IMPLIED>
   <!ATTLIST configgroup instance CDATA #IMPLIED>
   <!ATTLIST configitem name CDATA #IMPLIED>
   <!ATTLIST configitem instance CDATA #IMPLIED>
   <!ATTLIST value name CDATA #IMPLIED>
]>
<configrecord version = "0.1.0.1">
   <configgroup name = "Clock">
      <configitem name = "Source">
         <value>NTP</value>
      </configitem>
   </configgroup>
</configrecord>'
For examples using a local file or HTTP, see Import Configuration Group in the Web API Reference.
Exporting XML Status Records (XSR)
You can export the entire XML status record or only a portion of it. To export a portion, specify each group using the optionalGroupList parameter, with groups separated by a semicolon.
To export the XSR:
curl --digest -u admin:PASSWORD http://<ip-address>/export/status -X POST
To export a portion of the XSR:
curl --digest -u admin:PASSWORD http://<ip-address>/export/status -X POST -d "optionalGroupList=Device;Clock"
For additional cURL and Javascript examples, see Export Status Group in the Web API Reference.
Best Practices for XML Configuration
You can import or export an entire XCR, or just a portion of it, by specifying the group name and/or group instances. The following guidelines apply to importing an XML configuration using the CLI or Web APIs.
Missing Values
When importing an XCR, you do not need to supply all of the configuration items. However, depending on your import control, there are two possible behaviors for the missing values:
- Missing Values are left unchanged:
- Default if the XML Import Control group is absent from the XCR
- Explicit if the XML Import Control group contains the item Missing Values "Unchanged"
- Missing Values are set to Default for that value:
- Default if the XML Import Control group is present but the item Missing Values is absent from the XCR
- Explicit if the XML Import Control group contains the item Missing Values "Set to Default"
Passwords in the XML
When you export an XCR that contains secret fields, such as passwords and keys, the secret field values are replaced with the <Configured> placeholder. You will need to manually replace the placeholder with the actual secret value before you import the configuration. This applies to both the CLI and Web API methods.
Special Characters to be Replaced
Special characters that appear in the XCR as values must be replaced. For example, if your password contains any of the following special characters, you must replace them with the HTML character reference.
| Special Character | Replacement |
|---|---|
| & | & |
| < | < |
| > | > |
| ‘ | ' |
| “ | ". |
Removing Non-printable Characters from XCR
Some text editors may add extraneous non-printable characters to the XML configuration file. When you try to import the XML configuration, these extraneous characters will not be accepted by the gateway. To avoid errors due to added meta characters, we suggest that you use a basic text editor such as Notepad++ to edit the XML configuration files.
XML Configuration Language
The gateway provides an Extensible Markup Language (XML) interface that you can use to configure gateway's embedded device servers. Every configuration setting, excluding XML import and export, that can be issued from the Web Manager and CLI can be specified using XML.
The gateway can import and export configuration settings as an XML document known as an XML Configuration Record (XCR). An XCR can be imported or exported via the CLI. An XCR can contain many configuration settings or just a few. For example, it might change all of the configurable parameters for a gateway, or it may only change the baud rate for a single serial line. Using XCRs is a straightforward and flexible way to manage the configuration of multiple gateways.
Imported and exported XCRs begin with the following text:
<?xml version="1.0" standalone="yes"?>
<!DOCTYPE configrecord [
   <!ELEMENT configrecord (configgroup+)>
   <!ELEMENT configgroup (configitem+)>
   <!ELEMENT configitem (value+)>
   <!ELEMENT value (#PCDATA)>
   <!ATTLIST configrecord version CDATA #IMPLIED>
   <!ATTLIST configgroup name CDATA #IMPLIED>
   <!ATTLIST configgroup instance CDATA #IMPLIED>
   <!ATTLIST configitem name CDATA #IMPLIED>
   <!ATTLIST configitem instance CDATA #IMPLIED>
   <!ATTLIST value name CDATA #IMPLIED>
]>
<configrecord version="0.1.0.1">
All configgroups are positioned in the middle. Then the XML must end with the following text:
</configrecord>
XML Syntax
- A
<configrecord>element must have one or more<configgroup>elements and can have a version attribute. - Each
<configgroup>element must have one or more<configitem>elements, must have a name attribute and may have instance attributes. - A
<configitem>element must have one or more<value>elements, must have a name attribute, and may have an instance attribute. - A
<value>element contains data and may have a name attribute. - The name attribute identifies a group, item, or value. It is always a quoted string.
- The instance attribute identifies the specific instance when more than one instance is possible. The instance attribute is always a quoted string.
- An empty or missing
<value>element in each present<configgroup>clears the setting to its default.
Element Start and End Tags
An element consists of a start tag and an end tag that surrounds text and other elements. The start and end tags consist of a name surrounded by angle brackets, with a forward slash also preceding the name in the end tag. For example: <configrecord> _some elements_ </configrecord>. The element can also contain other "child" elements.
Element Attributes
The XML element attributes are name-value pairs included in the start tag after the element name. The values must be quoted, using single or double quotes. Each attribute name should appear only once in an element.
XML Example:
<configgroup name = "Clock">
  <configitem name = "Source">
    <value>Manual</value>
  </configitem>
</configgroup>
The gateway uses the attributes in the following section to label the group configuration settings.
Record, Group, Item, and Value Tags
A configgroup is a logical grouping of configuration parameters and must contain one or more configitem elements. It must have a name attribute and may have an instance attribute.
A configitem is a specific grouping of configuration parameters relevant to its parent group. An item takes the name attribute and must contain one or more value elements.
A value may specify the value of a configuration parameter. It may contain the name attribute.
A name attribute identifies the group, item, or value. It is always quoted (as are all XML attributes).
An instance attribute identifies which of several instances is being addressed. It is always quoted.
The following examples demonstrate the use of the record, group, item, and value XML elements in an XML configuration record.
Example of the use of multiple groups and multiple items:
<configrecord version = "0.1.0.1">
   <configgroup name = "Clock">
      <configitem name = "Source">
         <value>Manual</value>
      </configitem>
   </configgroup>
   <configgroup name = "Interface" instance = "ap0">
         <configitem name = "IP Address">
            <value>192.168.0.1/24</value>
         </configitem>
      </configgroup>
Example of the use of multiple named values:
<configrecord version = "0.1.0.1">
<configgroup name = "CPM">
<configitem name = "Role" instance = "AP Trigger">
<value name = "CP"><No CP Selected></value>
<value name = "State">Disabled</value>
<value name = "Assert">High</value>
<value name = "Mode">Push-Pull</value>
</configitem>
</configgroup>
</configrecord>
Web API
The Web APIs allow access to gateway functions through standard HTTP requests. The Web API methods provide the following capabilities:
- Access device configuration and status
- Work with files in the file system
- Perform firmware upgrades
You can use a client such as cURL to make requests from the command line or as part of a scriptable procedure.
If you are creating your own custom webpages, you can use the WebAPI with Javascript transactions to access the XML data (configuration and status).
Refer to the Web API Reference for more details about the Web APIs, including cURL and Javascript examples.