OEM Branding and Customization
This chapter describes ways that you can set and remove the OEM default configuration, including configuring OEM-specific settings, customize the appearance of existing web pages, and create new web pages to be served by the built-in web server.
OEM Default Configuration
Your product may contain settings that are different from the Lantronix factory defaults for the gateway. If so, you can define the default configuration to your settings.
You send the XML to load the XML configuration record (XCR). To change the default configuration, import the configuration settings that differ from the default with the following XML. You can do this through the serial port or the Web APIs. You do not need to import the entire configuration.
When importing configuration, you need to provide the current password, if set, in the XML Import Control configgroup. To change the password, provide the new password in the OEM configgroup.
<?xml version="1.0" standalone="yes"?>
<!DOCTYPE configrecord [
   <!ELEMENT configrecord (configgroup+)>
   <!ELEMENT configgroup (configitem+)>
   <!ELEMENT configitem (value+)>
   <!ELEMENT value (#PCDATA)>
   <!ATTLIST configrecord version CDATA #IMPLIED>
   <!ATTLIST configgroup name CDATA #IMPLIED>
   <!ATTLIST configgroup instance CDATA #IMPLIED>
   <!ATTLIST configitem name CDATA #IMPLIED>
   <!ATTLIST configitem instance CDATA #IMPLIED>
   <!ATTLIST value name CDATA #IMPLIED>
]>
<configrecord version = "0.1.0.1">
   <configgroup name = "XML Import Control">
      <configitem name = "OEM">
         <value>Set Configuration</value>
      </configitem>
      <configitem name = "Password">
         <value>[current-password]</value>
      </configitem>
   </configgroup>
   <configgroup name = "OEM">
      <configitem name = "Interface" instance = "eth0">
         <value name = "MAC Address">00 80 A3 B7 6A 59</value>
      </configitem>
      <configitem name = "Region">
         <value>Japan</value>
      </configitem>
      <configitem name = "Password">
         <value>[new-password]</value>
      </configitem>
   </configgroup>
</configrecord>
The XML Import Control configgroup with the Set Configuration value is necessary to save the OEM configuration as the factory default configuration.
The password, if set, protects your OEM configuration from being changed subsequently unless the XML Import Control configgroup contains the password. Set a password to keep your device secure. For more information on keeping your device secure, see Securing Your Device.
Removing OEM Configuration
To remove the OEM configuration and restore it to the default configuration, include Remove Configuration as shown in the following example:
<?xml version="1.0" standalone="yes"?>
<!-- Automatically generated XML -->
<!DOCTYPE configrecord [
   <!ELEMENT configrecord (configgroup+)>
   <!ELEMENT configgroup (configitem+)>
   <!ELEMENT configitem (value+)>
   <!ELEMENT value (#PCDATA)>
   <!ATTLIST configrecord version CDATA #IMPLIED>
   <!ATTLIST configgroup name CDATA #IMPLIED>
   <!ATTLIST configgroup instance CDATA #IMPLIED>
   <!ATTLIST configitem name CDATA #IMPLIED>
   <!ATTLIST configitem instance CDATA #IMPLIED>
   <!ATTLIST value name CDATA #IMPLIED>
]>
<configrecord version = "0.1.0.1">
  <configgroup name = "XML Import Control">
    <configitem name = "OEM">
      <value>Remove Configuration</value>
    </configitem>
    <configitem name = "Password">
      <value>[secret-phrase]</value>
    </configitem>
  </configgroup>
</configrecord>
OEM Specific Settings
You can configure OEM specific settings such as the region code and/or MAC Address to values that differ from the Lantronix factory default configuration.
The region code should be configured to the region where your product will be sold.
The MAC address can be configured for the different interface instances.
Changing Region Code
Set the region code to the region where the unit will be used.
The following region codes are supported:
- United States
- Canada
- Japan
- European Union
- China
- Australia
- New Zealand
To change the region code, include the following XML, with the Region value configured to the appropriate region:
<configrecord version = "0.1.0.1">
   <configgroup name = "OEM">
      <configitem name = "Region">
         <value>Japan</value>
      </configitem>
   </configgroup>
</configrecord>
If the unit will be used in a different region not listed above, contact your Lantronix FAE or Technical Support to get specific regional code information.
Changing MAC Address
You can configure the MAC address for the interface instances. If you don't specify the interface, it will assign to eth0 by default. When you change the MAC address, the DHCP server will assign a different DHCP address on eth0 and wlan0.
To change the MAC address, include the following XML:
<configrecord version = "0.1.0.1">
   <configgroup name = "OEM">
      <configitem name = "Interface" instance = "ap0">
         <value name = "MAC Address">00 80 A3 B7 6A 60</value>
      </configitem>
      <configitem name = "Interface" instance = "eth0">
         <value name = "MAC Address">00 80 A3 B7 6A 59</value>
      </configitem>
      <configitem name = "Interface" instance = "wlan0">
         <value name = "MAC Address">00 80 A3 B7 6A 60</value>
      </configitem>
   </configgroup>
</configrecord>
Web Manager UI Customization
You may want to customize the web pages that are served by the built-in web server. There are multiple ways to achieve this, so you need to think about how you want it to look.
You can make the following types of customizations:
- Change the Web Manager brand colors and logo to your specifications
- Add configuration tabs to Web Manager
- Remove configuration tabs from Web Manager
- Create custom web pages (next section)
You can use the existing Lantronix pages and remove certain items while also adding your own items, or you can create your own custom pages that don't use Lantronix HTML/Javascript at all.
This section provides an overview of how to get started with doing both.
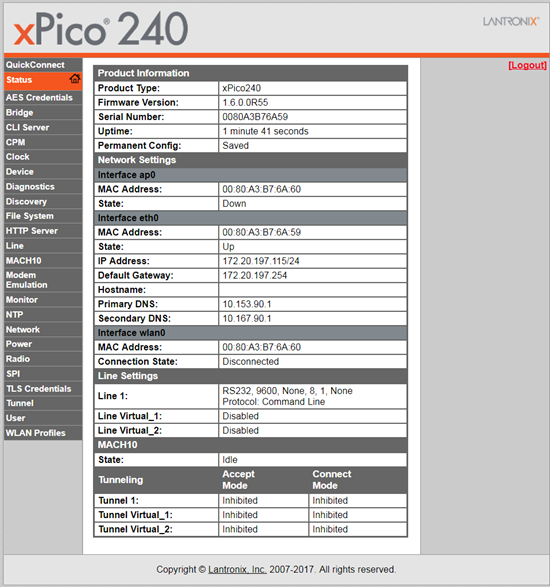
Web Manager Default Appearance
The default Web Manager looks like this:
Overriding Files
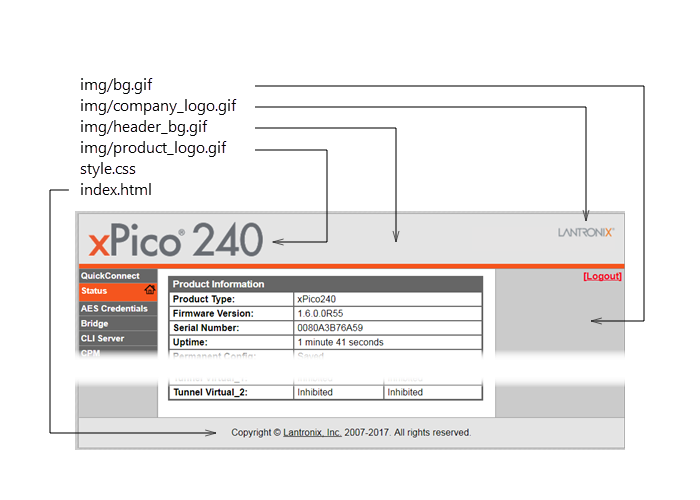
The HTML, Javascript, and CSS files that make up the default Lantronix web pages are built into the Lantronix firmware. These are called overridable files, in that you can create your own to be served instead of the default ones. The overridable files are:
- index.html – Main file controlling text and graphics
- style.css – Style sheet
- img/bg.gif – Main background
- img/company_logo.gif – Company logo in header container
- img/product_logo.gif – Product logo in header container
- img/favicon.ico – Shortcut icon
- img/header_bg.gif – Head container background
If you would like to override a file, place it in the following directory in the filesystem: /main/http/web_manager
You can create the override file from scratch, or you can save as source the Lantronix one and modify it. If you would like to see the source of the Lantronix default page, you can find it in the following directory: /embedded/main/http/web_manager
The following picture shows the effect of the different overridable files:
Removing Configuration Tabs
If you would like to remove tabs from the left-side menu, you can do so by overriding the style.css with your own file that hides the different menus. Copy the default style.css file and set any menus that you want to hide to the display:none; style. For example, to hide the SPI, the style.css would have:
#spi_Index
{
    display: none;
}
The list of IDs used for each tab is:
- quickconnect_Index
- status_Index
- aes_credentials_Index
- bridge_Index
- cliserver_Index
- cpm_Index
- clock_Index
- device_Index
- diagnostics_Index
- discovery_Index
- filesystem_Index
- httpserver_Index
- line_Index
- modem_emulation_Index
- monitor_Index
- ntp_Index
- network_Index
- performance_Index
- radio_Index
- spi_Index
- tls_Index
- tunnel_Index
- user_Index
- wlan_profiles_Index
Adding Configuration Tabs
The Lantronix User Data module makes it easy to add tabs with your own data to the existing default pages, without having to redesign all the pages by yourself. This also lets you save your own configuration values that you can get via XML through the usual ways of reading configuration (either serial port or WebAPI).
To add a new tab, follow these steps:
- Create /user_data directory on the filesystem.
- Create /user_data/http directory.
- Create /user_data/http/web directory.
- In the web directory, add a file called user_data_specification.js.
- Go back and create /user_data/http/help directory.
- Put config.Custom.html file into the help directory.
- Reboot your device, notice the new "Customization" tab.
user_data_specification.js:
UserData_RegisterTab(
    {
        name: "Customization",
        page: [
            {
                group:"Alarms",
                item:["Alarm Level","Notify","Severity"],
                checkFormValues: function() {
                    PrintMsg("");
                    var a = UserData_GetValue("Alarm Level");
                    if(a && ! a.match(/^\d+$/)) {
                        PrintMsg("ERROR: Alarm Level must be numeric.\r");
                        return false;
                    }
                    return true;
                }
            },
            {
                group:"Device",
                item:["Serial Number","Rank"]
            }
        ]
    }
);
config.Custom.html file:
<div id="help.config.Custom" style="display:none">
    <p>
        The idea is, user custom configuration values are stored under this group.
    </p>
</div>
<div id="help.config.Custom.Alarms" style="display:none">
    <p>
        The OEM places help for the overall <b>Alarms</b> page here.
    </p>
</div>
<div id="help.config.Custom.Alarms.Alarm Level" style="display:none">
    <p>
        The OEM describes <b>Alarm Level</b> in detail here.
    </p>
</div>
<div id="help.config.Custom.Alarms.Notify" style="display:none">
    <p>
        The OEM describes <b>Notify</b> in detail here.
    </p>
</div>
<div id="help.config.Custom.Alarms.Severity" style="display:none">
    <p>
        The OEM describes <b>Severity</b> in detail here.
    </p>
</div>
<div id="help.config.Custom.Device" style="display:none">
    <p>
        The OEM places help for the overall <b>Device</b> page here.
    </p>
</div>
<div id="help.config.Custom.Device.Serial Number" style="display:none">
    <p>
        The OEM describes <b>Serial Number</b> in detail here.
    </p>
</div>
<div id="help.config.Custom.Device.Rank" style="display:none">
    <p>
        The OEM describes <b>Rank</b> in detail here.
    </p>
</div>
The files above will create the following tab called Customization:
Accessing Your Custom Data
To access your custom configuration data stored when a user enters data in the page above, you can use the standard methods of getting the configuration XML (XCR) data, and look for the "Custom" configuration group.
<configgroup name = "Custom" instance = "Alarms">
    <configitem name = "Item" instance = "Alarm Level">
       <value name = "Value"></value>
    </configitem>
    <configitem name = "Item" instance = "Notify">
       <value name = "Value"></value>
    </configitem>
    <configitem name = "Item" instance = "Severity">
       <value name = "Value"></value>
    </configitem>
</configgroup>
Creating Your Own Webpages
If instead of modifying the existing pages, you would like to create your own pages, you can do so easily by placing your source files in the /http/ directory of the filesystem. You will need to create the directory first.
Any HTML file placed there will be served at the root of the web server. That is, if you create a file called /http/test.html, it will be seen at address:
http://<ip-address-of-xPico-gateway>/test.html
Accessing Configuration and Status
To access gateway configuration and status from your own custom web pages, you can use the Web API with Javascript transactions to get the XML data (XCR for configuration, XSR for status). With the Web API you can:
- View current configuration
- Upload new configuration
- View current status
- Take status actions (such as toggling GPIO, sending data to serial ports, etc.)
See WebAPI Reference for more details and Javascript examples.
JavaScript Library
The xPico Wi-Fi Web API Javascript Library also applies to xPico 200 series devices. This library makes it easy to use the xPico 200 series gateway's Web API to access the hardware features of the device. The library takes care of all the HTTP transactions and XML building and parsing for you.
See xPico Wi-Fi Web API JavaScript Library on GitHub.